
This time, we will look at how to configure a sequence in Premiere when working with 5.1 surround files during video and audio production, and how a 5.1 surround system is arranged.
Although 2.0 stereo is generally the standard for audio, people sometimes purchase 5.1 surround speakers for a more realistic and powerful experience.
Video producers who use Premiere need to take these viewers into account as well, and as 5.1 surround becomes more widespread over time, being able to prepare for it in their work will be useful.
5.1 Surround Configuration
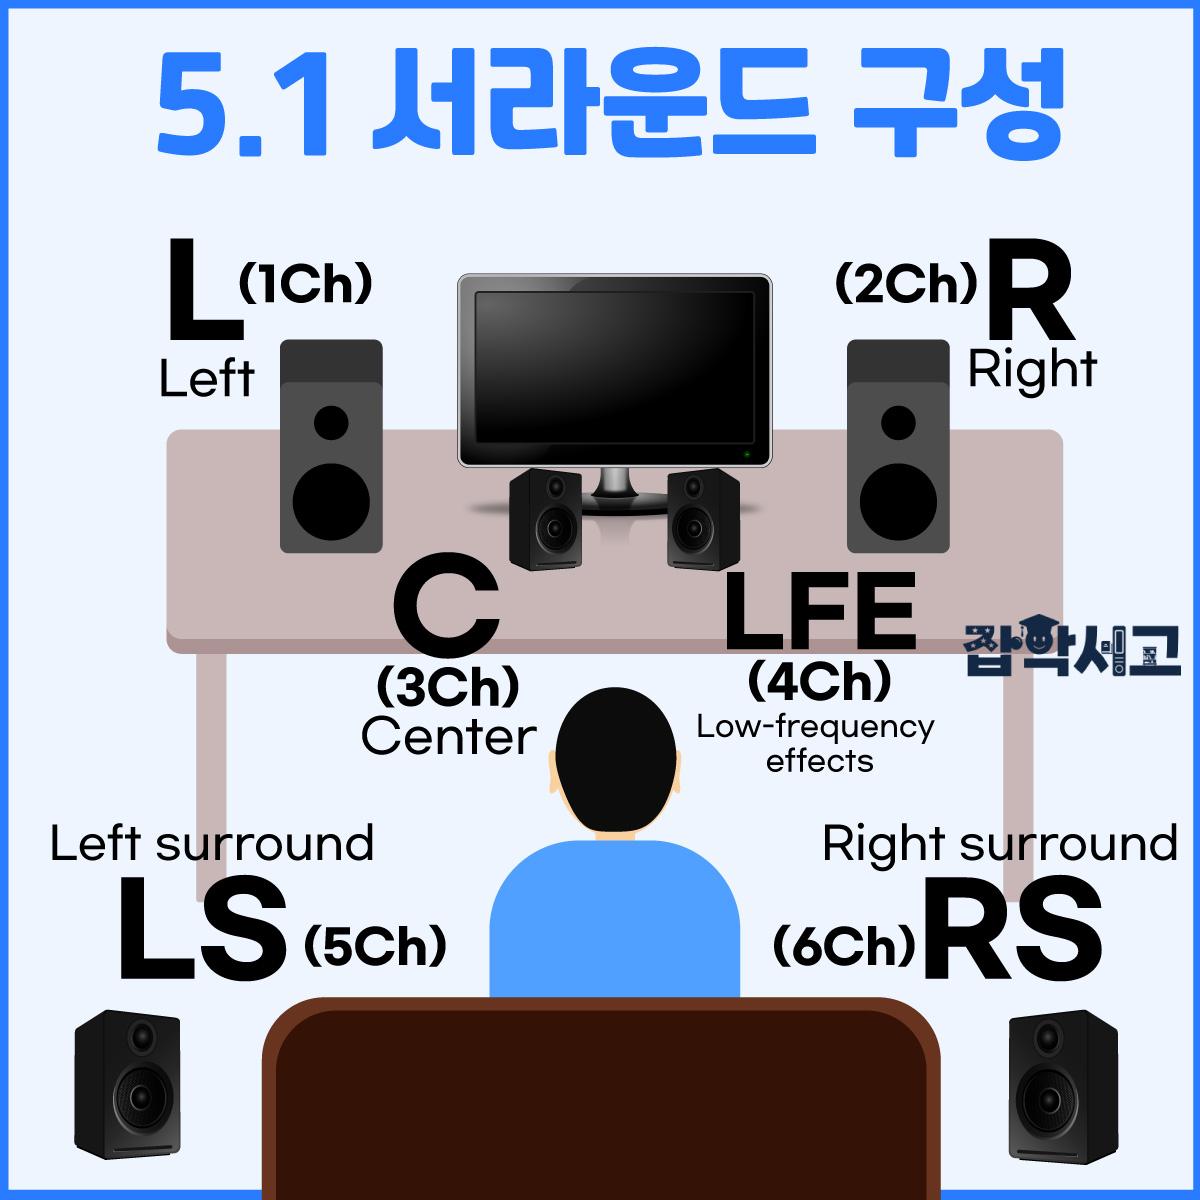 5.1 Surround Configuration Diagram
5.1 surround consists of 6 channels: L (Left), R (Right), C (Center), LFE (Low-frequency effects), LS (Left surround), and RS (Right surround). LFE is a separate channel for low-frequency effects, represented as .1 because it uses a limited frequency bandwidth. It is not a low-volume copy of the other 5 channels. The LFE channel must also be distinguished from the actual subwoofer output.
5.1 audio can be downmixed to 2.0 stereo by playback devices or software that support it. However, the result depends on the file format, playback environment, and downmix settings, so correct playback is not automatically guaranteed. Whether a separate stereo mix must also be delivered depends on the delivery specifications.
For reference, looking at what goes into each channel, music generally goes into channels 1 and 2, dialogue into channel 3, low-frequency audio into channel 4, and location sound and sound effects into channels 5,6.
Now, we will look at how to set up 5.1 surround in Premiere.
How to Set Up 5.1 Surround in Premiere
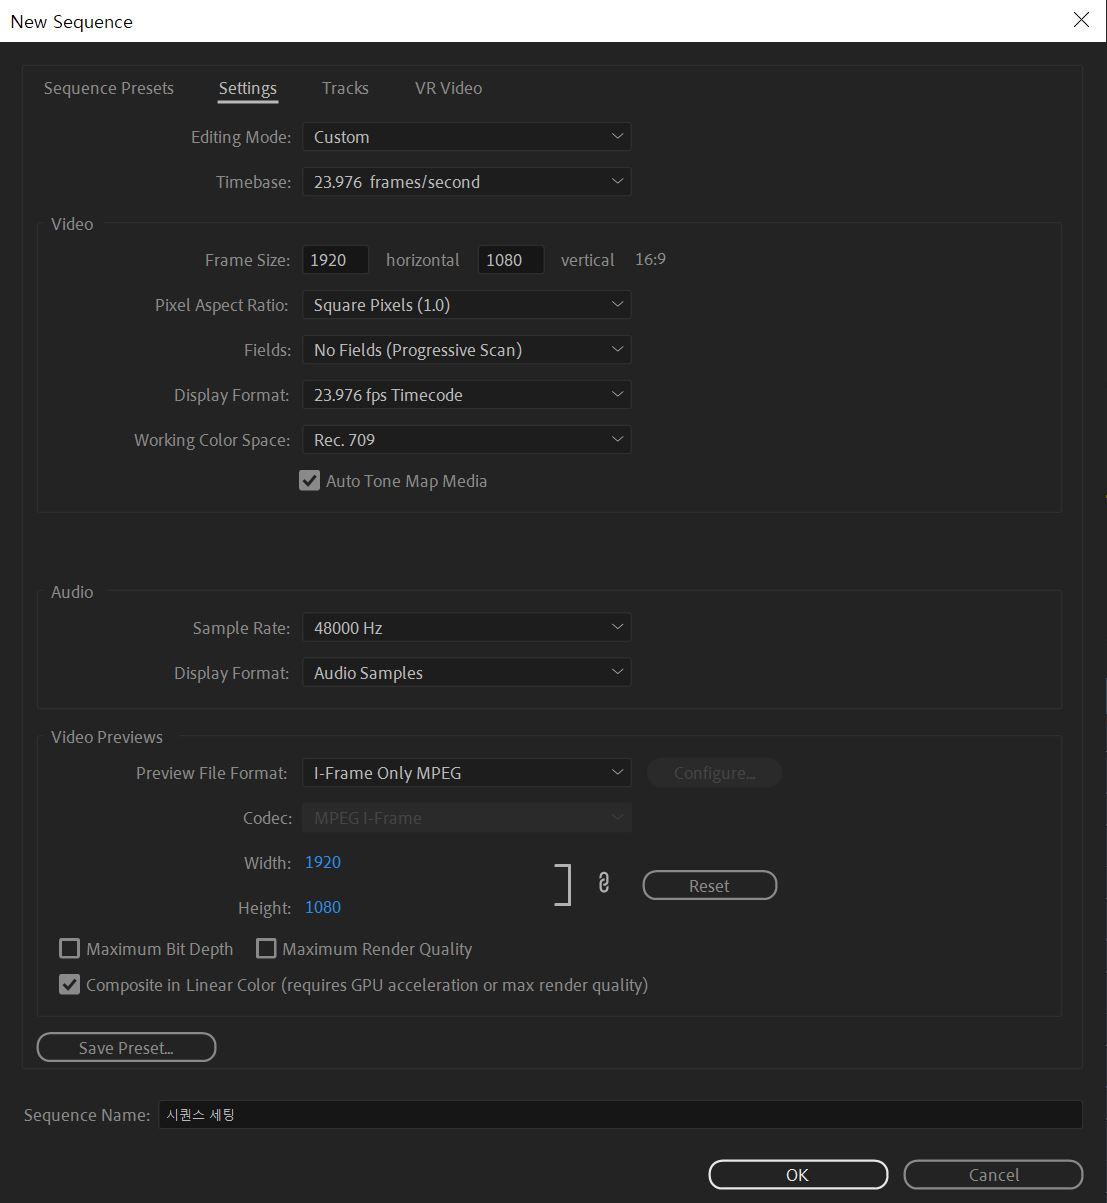 Sequence Settings for Video Specifications
First, the very first thing to set up is, of course, the basic specifications of the video. Configure the video settings, such as resolution, frame rate, Pixel Aspect Ratio, and scanning method, as well as the audio specifications, to match the footage you have prepared.
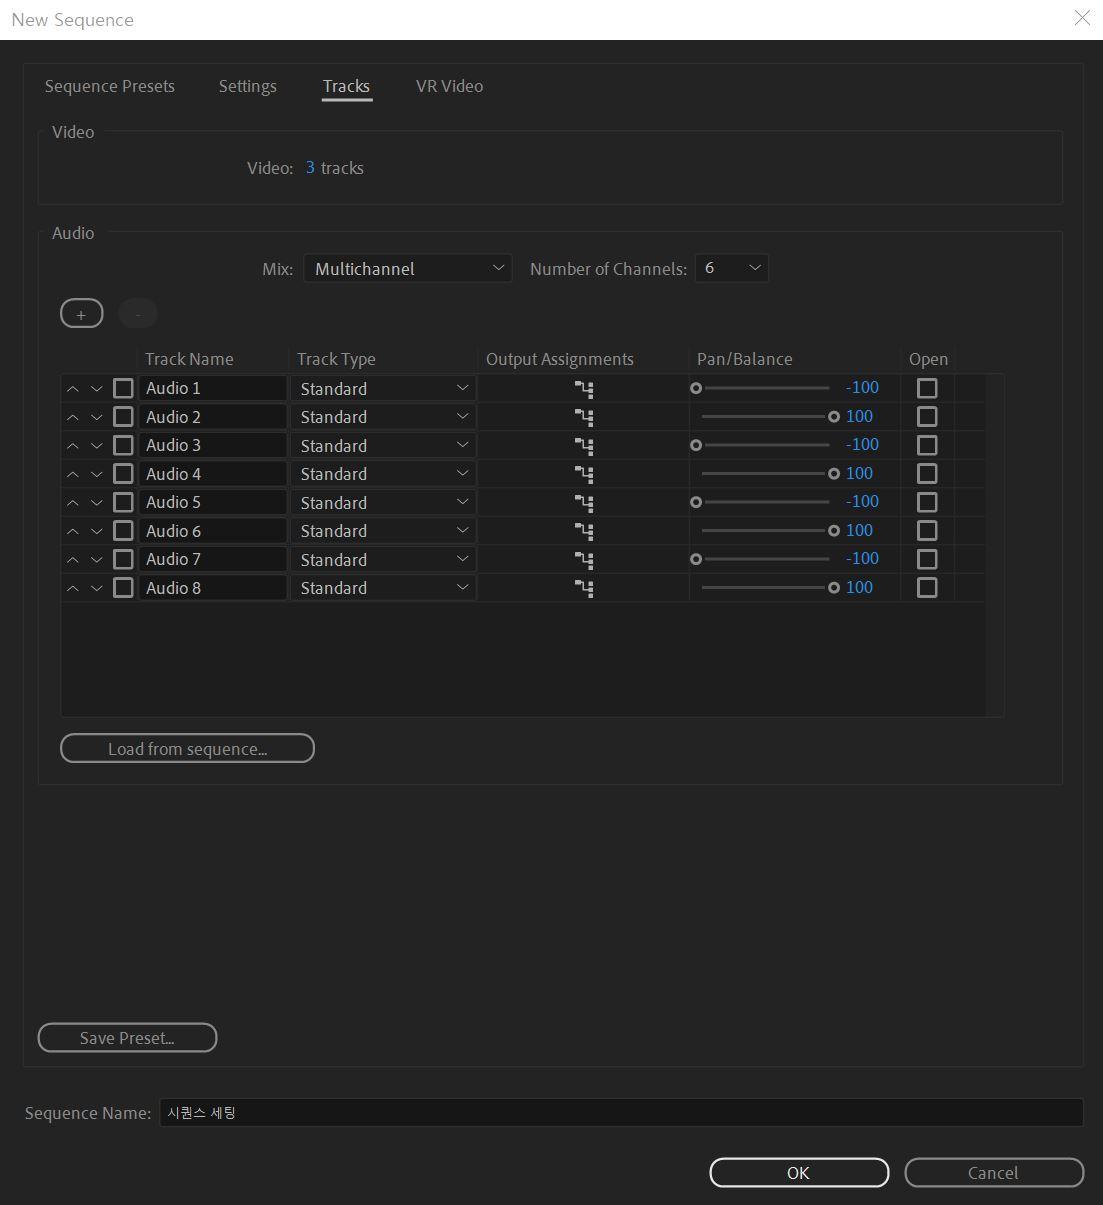 Sequence Settings for 5.1 Surround Tracks
The following is an 8-channel workflow example that delivers the 6 channels of 5.1 together with a separate 2-channel stereo mix. In the Tracks menu, set Mix to Multichannel and set the output channel count to 8. The screenshot above shows Number of Channels set to 6; when following this 8-channel example, set it to 8 instead. Creating 8 audio tracks alone does not produce 8 output channels.
5.1 surround itself has 6 channels. Channels 7 and 8 are added in this example to deliver a separate stereo mix; this does not mean that every 5.1 delivery requires 8 channels.
Here, channels 7 and 8 contain the 2.0 stereo audio. They are abbreviated as LT (Left Total) and RT (Right Total).
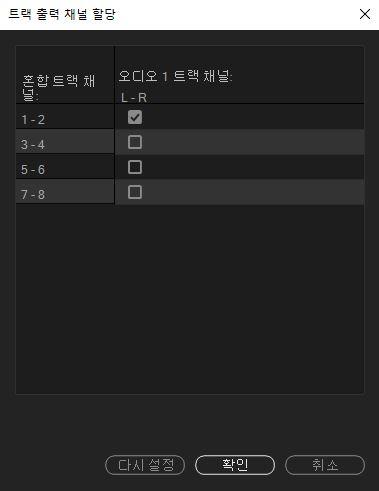 Audio Track Group Settings (Channel Assignments)
Next, you need to click the shape icons shown in the middle to pair up the channels. You can also do this in the track mixer, as shown below, but assigning them in advance in these sequence settings and saving them as a preset makes later work much simpler.
For each audio channel, click the shape icons under Output Assignments, then group channels 1-2 together, group channels 3-4 together, group channels 5-6 together, and group channels 7-8 together to create a total of 4 groups.
Finally, for each group of 2 channels, set the left/right panning controls on the right to -100/100 respectively to complete the basic channel mapping setup.
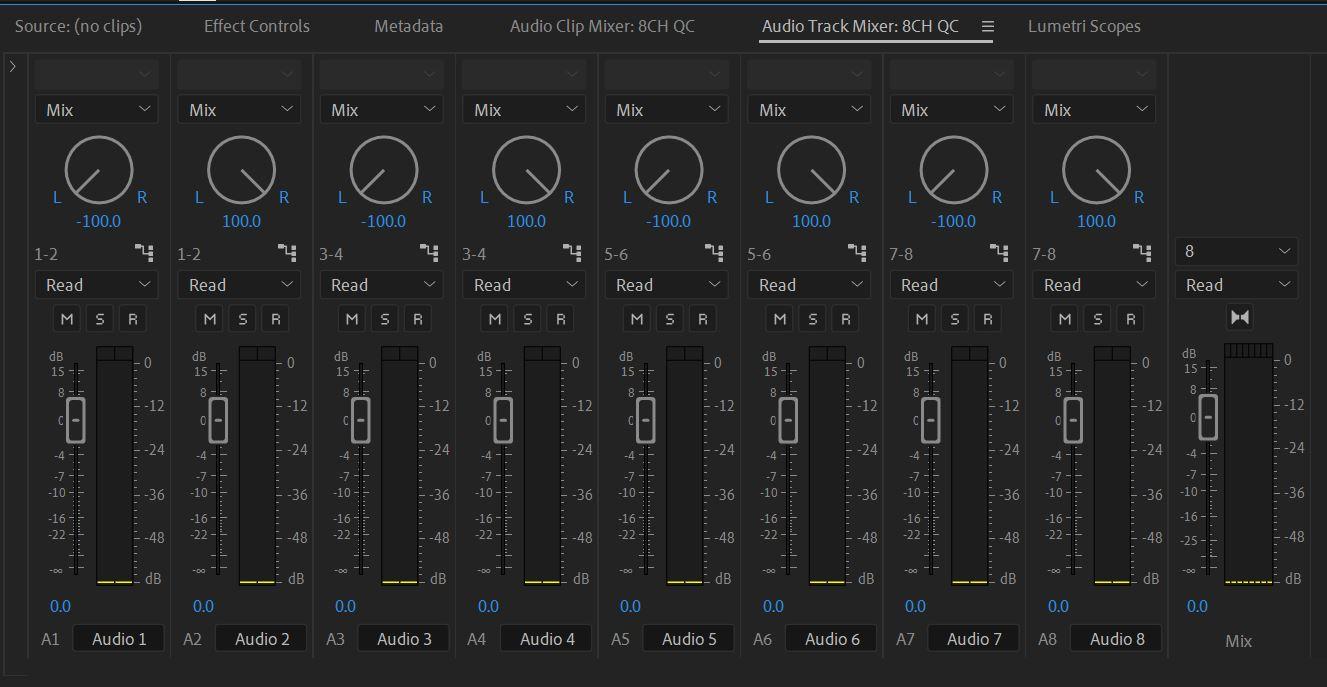 Audio Track Mixer Setup
After creating the sequence and opening the Audio Track Mixer, you should see the settings shown in the image above. The key is to group the channels correctly in groups of 2 and pan them left and right.
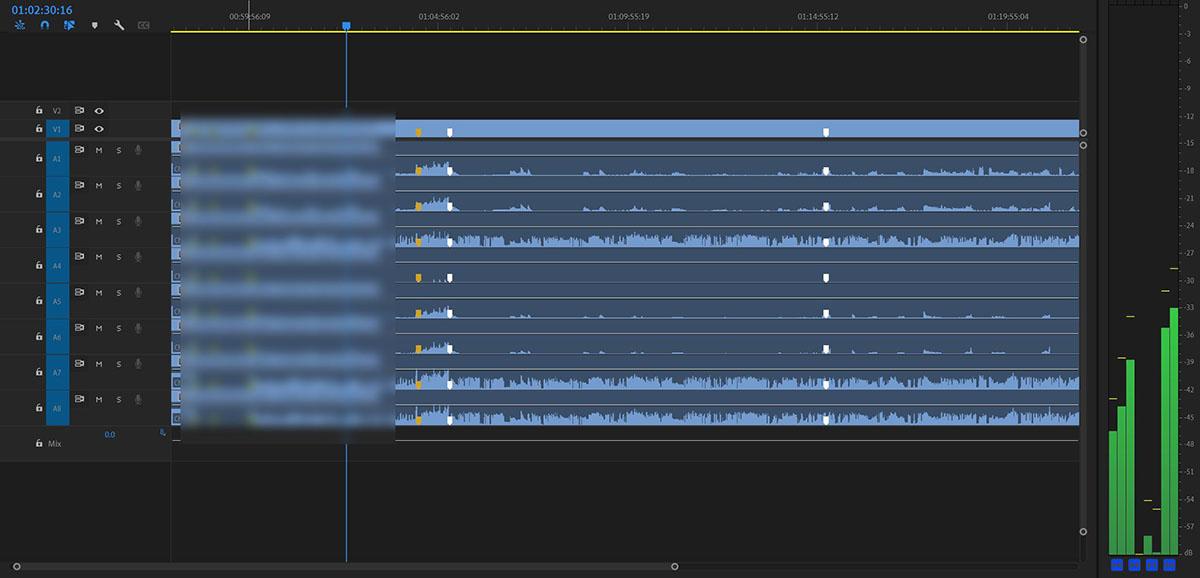 Audio Waveforms on the Timeline
After importing the file into the timeline, select the clip and similarly pan the 8 channels left and right in groups of 2 in the Audio Clip Mixer. Since the clip mixer works on an individual clip as a whole, doing this before starting work saves you the trouble of manually adjusting each clip after editing.
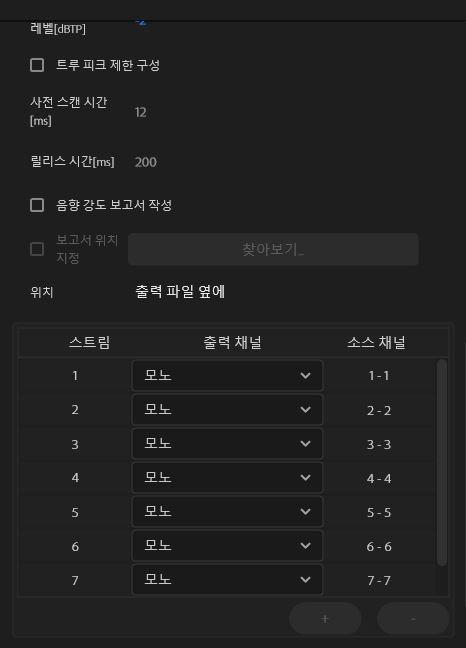 When Applying Loudness Settings During Export
You can then begin working, set the audio to 5.1 channels in the Export settings, and proceed with the export, but if you apply loudness normalization (Loudness), you need to designate each channel as mono according to the number of channels, as shown in the image above, so that 5.1 surround plus 2-channel stereo, for a total of 8 channels, is exported correctly.
Mapping After Finishing the Work (When Not Applying Loudness)
 Mapping in QuickTime
If you do not apply loudness normalization (Loudness) settings during export, you need to perform additional mapping separately in QuickTime. First, open the exported file in QuickTime and press Control + J to open the audio properties window.
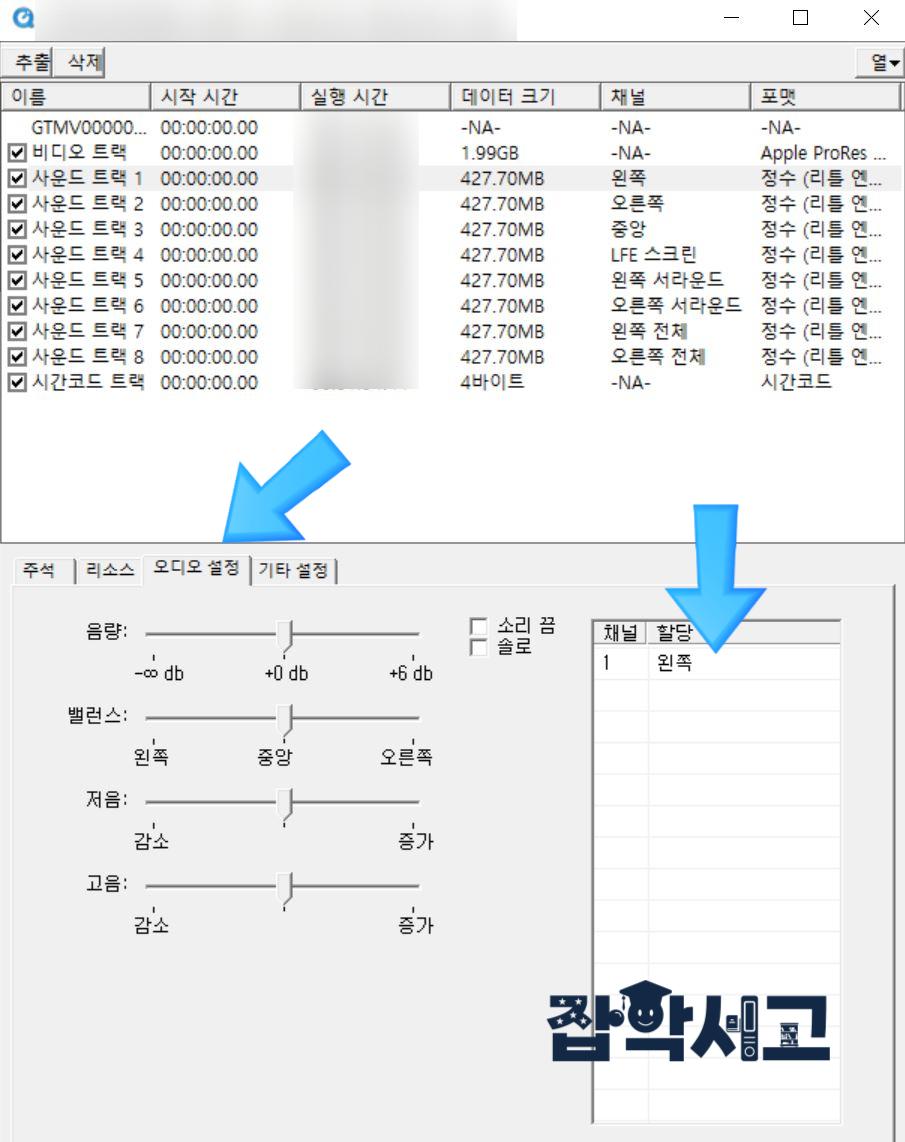
If you exported with 8 channels, you should see a total of 8 soundtracks on the screen; select each channel and click the Audio Settings menu.
You can then assign each channel on the right; map them in the 5.1 surround channel order: Left, Right, Center, LFE Screen, Left Surround, Right Surround, Left Total, and Right Total.
We have now looked at how to configure 5.1 surround channels, but unlike working with 2.0, it may look very complicated and difficult when you first encounter it.
I showed the configuration diagram at the very beginning because I thought you needed to understand the concept first before you could configure surround in Premiere. Still, if you work in a video-related profession, I believe this information will certainly be useful someday.